
K3 Use and Instructions
Instruction
K3 is a plug-and-play, multi-functional external mechanical keyboard with a
13-inch touch screen that meets your needs for multiple-screen display, keyboard
input, HUB expansion, and M2 solid-state hard disk interface expansion. It can
quickly set up a personal mobile studio to provide computer users with a perfect
solution for multi-screen display, TP touch, keyboard input, and HUB expansion,
which can increase your work efficiency by 50% and achieve efficient task
processing.
K3's screen can be freely adjusted to 0-90 degree display angle, and supports
adjustment of brightness, contrast and other parameters settings, and is equipped
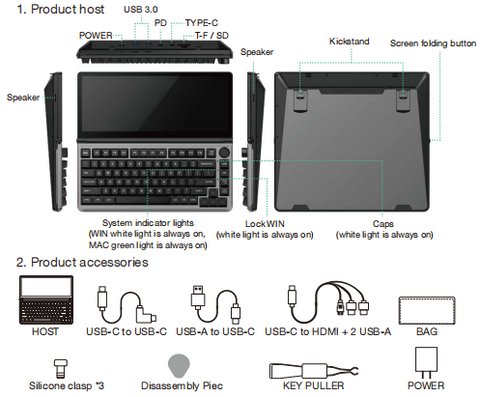
with TYPE-C / USB3.0 / TF/SD / M2 B&M key / B key interfaces. You can achieve
one-line connection display without expansion dock. With a computer with HDMI
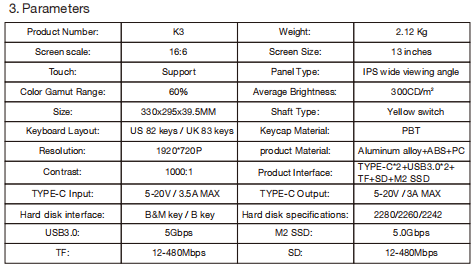
output interface, you can use our customized TYPE-C TO HDMI + 2USB-A line to
achieve one-line connection display, bringing you convenient and fast experience.
K3 comes with an 82-key mechanical keyboard, with hot-swappable process
and customized shaft for easy replacement, allowing customers to enjoy different
feel experiences with the same keyboard. It has backlight adjustment and supports
custom backlight recording and driver macro programming, giving you a different
experience and fun.
Product Attributes
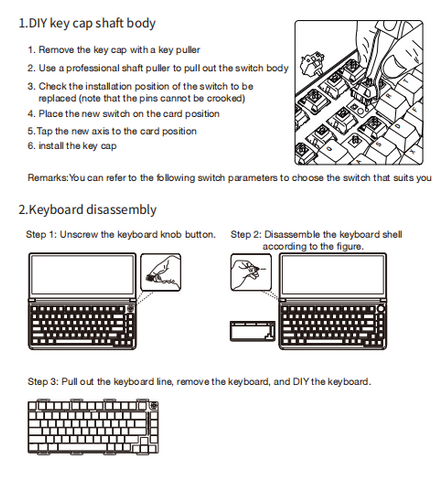
Installation
DIY Keyboard
Product connection method
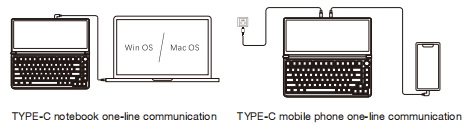
1.TYPE-C interface computer/mobile phone connection method
Only a TYPE-C notebook/mobile phone with signal + power supply + video can achieve one-line communication.
Note: The data line connected to the computer must be connected to the TYPE-C interface of the product to achieve video and data transmission.
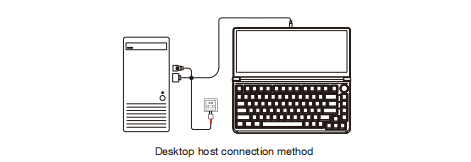
2.HDMI interface computer / mobile phone connection method
Note:Desktop/laptop/mini PC with HDMI output port can be directly connected to display
It can be connected via TYPE-C TO HD+2USBA cable, the computer end is connected to the HDMI interface and USB interface, and the keyboard end is connected to the TYPE-C connector.
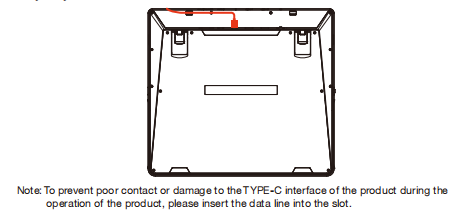
3.they way to secure the cable
Audio setting
- Switch settings of Windows 10 / Windows 11 computer end output
1.1 Right click the loudspeaker icon down-right

1.2 Select "switch on sound " in pop-up dialog box
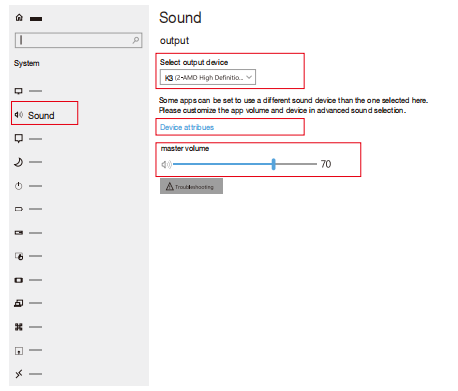
1.3 Left click "turn on sound settings" and pop-up the box as provided,Here users can set about sound;
Here users can set about sound
- Master volume;
- Select output device: (K3-R/speaker);
- Device attributes.
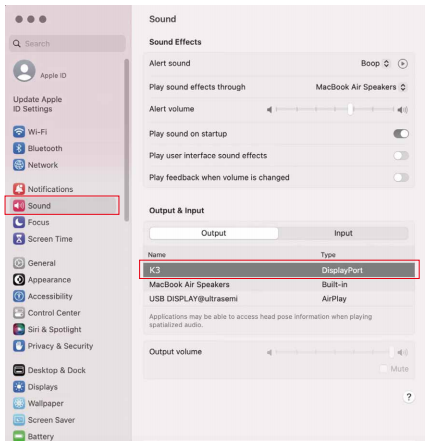
- Settings of MACOS computer end sound
2.1. Switch settings of MAC computer end sound output
2.2. Click computer's "settings" APP

2.3. Select "sound" in dialog box and pop-up as provided:
Click "output", users can do settings about sound;
Select output device: ( K3 / speaker )
Display setting
1.Windows 10 / Windows 11 Display Settings and Configuration
1.1 Right-click a blank area of the desktop. In the pop-up dialog box, select "Display Settings".
Left click "Display Settings" to open the dialog settings box as shown:

1.2 The user can now rearrange the multiple displays orientation by clicking and dragging the items in
the "Rearrange your display" section. Scrolling down towards the bottom of the page will also allow
the user to further configure the displays to either extend the desktop interface or to duplicate the main screen.
Note:1. Please set the display orientation to vertical flip when using the product with a support stand in portrait mode.
- If the resolution when starting up the product is not 1920*720P, please unplug and re-insert the data cable.
2.MacOS 13 Ventura Display Settings and Configuration
2.1 Enter the “System Preferences” menu
2.2 The user can now configure their displays to their liking.
In this menu, the user can set the resolution and mirror/expand the display you want.

2.3 Arrange Displays
To rearrange displays, drag them to the desired position. To mirror displays, hold Option while
dragging them on top of each other. To relocate the menu bar, drag it to a different display.

Touch settings
Windows 7 System Touch Settings
1.Click the Start button → Click Control Panel → Choose Tablet PC Settings.

2.The following text appears on the main screen.

Windows 10 / Windows 11 System Touch Settings
1.Click the Start Button → Search Open Control Panel → Choose Hardware and Sound → Click Tablet Settings.

2.Tablet PC settings → Click to display → Click to set

3.The following text appears on the main screen.

MAC system computer touch settings
- Move the mouse cursor to the keyboard screen, touch the coordinate point on the keyboard screen to complete the settings.

2.When connected to a MAC operating system computer, when the screen direction has rotation, you need to correspond to the touch coordinates in the fourth option of the OSD menu to ensure the accuracy of the touch coordinates.

OSD Settings

Note:
1.Pop up the OSD menu: Swipe down with two fingers in the bottom-right corner of the screen to pop up the OSD menu.
2.To exit the OSD menu: Swipe up with two fingers in the bottom-right corner of the screen to exit the OSD menu.

- Screen brightness adjustment.
- Sound adjustment.
- Warm, Standard, Cool mode adjustment.
- MAC OS Touch coordinate adjustment.
- Restore settings.
Key Definition
1.Keyboard key definition


Note: The main backlight has a total of 20 lighting effects (custom lighting, rhythm and shadow only support drive control).
2.key definition


Note: When connecting to a MAC OS system, the computer's audio output must be from the computer's built-in sound card to ensure proper functioning.
Driver definition
1.Driver installation
1.1 Download K3 driver from official website → Double-click to install K3 driver →
Installation successful.
Download URL: https://mega.nz/folder/Z2t1HJYD#jrG1ms12BPr9UEJwGhiRlg


Note: In the driver interface, you can set the keyboard lighting, macro programming, language settings, driver updates, configuration layer settings, etc. If you need to log in to the personal center and share the scheme, you need to register and log in to the driver.
Storage and use requirements
In order to ensure the normal use of this product and prevent accidents such as electric shock or fire,
please read and understand all use requirements and operation procedures before using.
Please strictly abide by the following requirements.
- Please tear off the protective film on the screen surface before use.
- The DC power supply required by this product is AC/DC power adapter, which should be far away from heat source and placed in a well ventilated place. The AC power socket and AC power line should be well grounded and can withstand enough current demand.
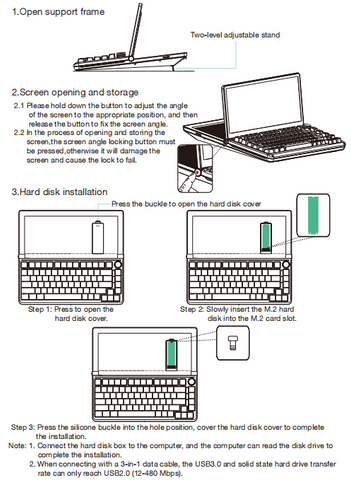
- The DC power input required by this product is 5v-20v ± 2V.
- Attention should be paid to avoid excessive humidity and dust, so as to avoid circuit corrosion and failure.
- Screen surface should not be challenged by external force.
- Do not use sharp tools to touch the screen surface.
- This product fits general business and domestic use, and ambient temperature ranging from-20~60°C is recommended.
- Please power off power source when stop using device.