
P2 PRO Tri-screen
PS:This is the instruction for Kwumsy P2 PRO triple screen. If you would like to know about other models instructions, please refer to other instruction pages or contact Kwumsy customer service:
contact@kwumsy.com
The P2 PRO holder is firm and easy to use. Press the lock switch lightly, and the holder will pop up automatically. Clamps it on the top of the computer screen, and adjusts it to the required size, it can be easily and firmly hung. It supports the laptop shell of 13.3-16.5 inches, providing users with convenient and quick experience.
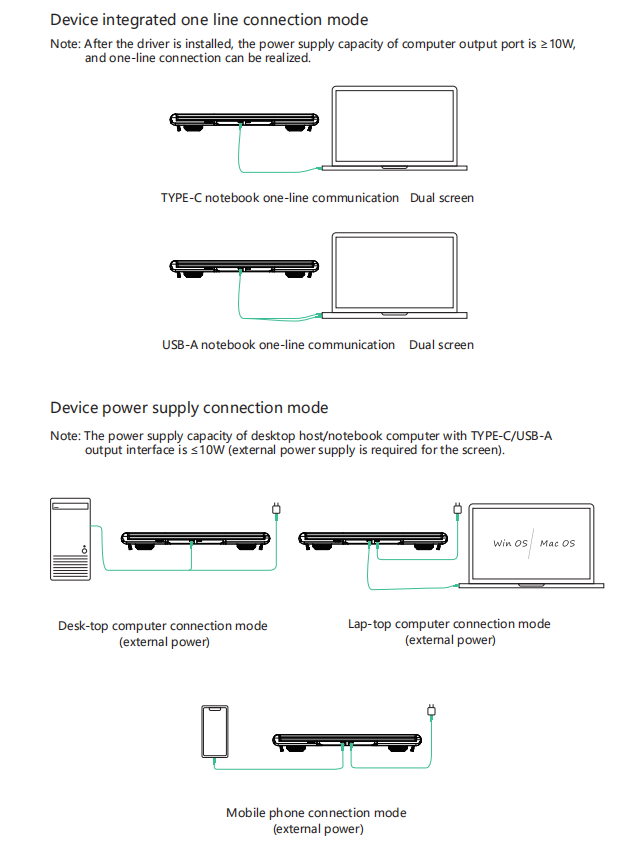
P2 PRO can independently adjust display parameters such as brightness and contrast. After installing a special driver on the PC, no matter whether the output port of the computer is TYPE-C or USB-A, only one line is needed to connect, and both screens can be lit.
P2 PRO splitter single-screen can be rotated up to 207 degrees per screen, so you can choose your perfect angle to give you the best visual experience.
Installation and Stowing Mode

Connection Method
MACOS and Windows Display Settings
Insert TF card and open "Display driver" on your laptop/mobile phone file management to view the operation instructions to install the driver.
1)Video output switching settings on the MACOS system computer
- Video output switching settings on the MACcomputer
- Click the computer "Settings"icon
- Select "Display" in the pop-up dialog box, and a display box as shown in the figure will pop up. The user can set the display Output/Rotation/Refreshrate/Brightness.
- Click "Arrangement" in the monitor setting menu, and a display box as shown in the figure will pop up, where the user can set the Arrangement/Mirror of the extendedscreen
2)Video output switching settings on the Windows 10 systemcomputer
- Right click in the blank area of the computer desktop. In the pop-up dialog box, select "Display settings"; left click "Display settings" to pop up the dialog setting box asshown:
- As shown in the figure above, the user can set the displayed "rearrangedisplays";
- The user can set the "Brightness and color" of thedisplay
You also can refer to the driver installation for Windows/MACOS on Kwumsy Youtube:
Mac OS/Window OS/Android Driver Download Link:
https://drive.google.com/drive/folders/1l79_SMTsyoBLqUmldyZtBHqkm9t91PnM
|
Button |
Operating steps |
Functions |
|
POWER button |
1. Press the POWER button for a short while in the shutdown state; |
Screen boot: The screen LOGO displays 3S, and the image appears after 5S |
|
2.Select the selected cursor in the OSD menu interface, and press the power key for 1 second; |
Function as "OK button" |
|
|
3. In the OSD menu interface, press for 2 seconds |
Function as layers of "back button" |
|
|
UP key |
1. When the OSD menu is not displayed: short press |
The right screen OSD menu interface will pop up |
|
2.When the OSD menu displays the progress bar: short press |
Press it to switch up the current option or add a parameter with the smallest unit |
|
|
3. When the OSD menu displays the progress bar: long press |
Quickly adjust parameter values or options |
|
|
4. When in the OSD menu interface: short press |
Move the cursor up |
|
|
DOWN key |
1. When the OSD menu is not displayed:short press |
The left screen OSD menu interface will pop up |
|
2.When the OSD menu displays the progress bar: short press |
Press it to switch down the current option or decrease the parameter of a minimum unit; |
|
|
3. When the OSD menu displays the progress bar: long press |
Quickly adjust parameter values or options |
|
|
4. When in the OSD menu interface: short press |
Move the cursor down |
In order to ensure the normal use of this product and prevent accidents such as electric shock, fire and so on, please read and understand all usage requirements and operating procedures before using this product. Please strictly comply with the following requirements:
- Please tear off the protective film on the surface of the screen before using;
- The DC power supply required by this product is AC / DC power adapter, which should be far away from heat source and placed in a well ventilated place. The AC power socket and AC power line should be well grounded and can withstand enough current demand.
- The DC power input required by this product is 5v-20v/ ± 2V, and its normal working power is≥10W
- Pay attention to avoid excessive humidity and dust, so as to avoid circuit corrosion causing failure;
- Do not squeeze the surface of the product screen;
- Do not use sharp objects to touch the screen surface;
- This product is suitable for general commercial use and household use, and the optimal environment temperature is -20-+60℃;
- When you stop using the equipment, please disconnect the power supply in time.